
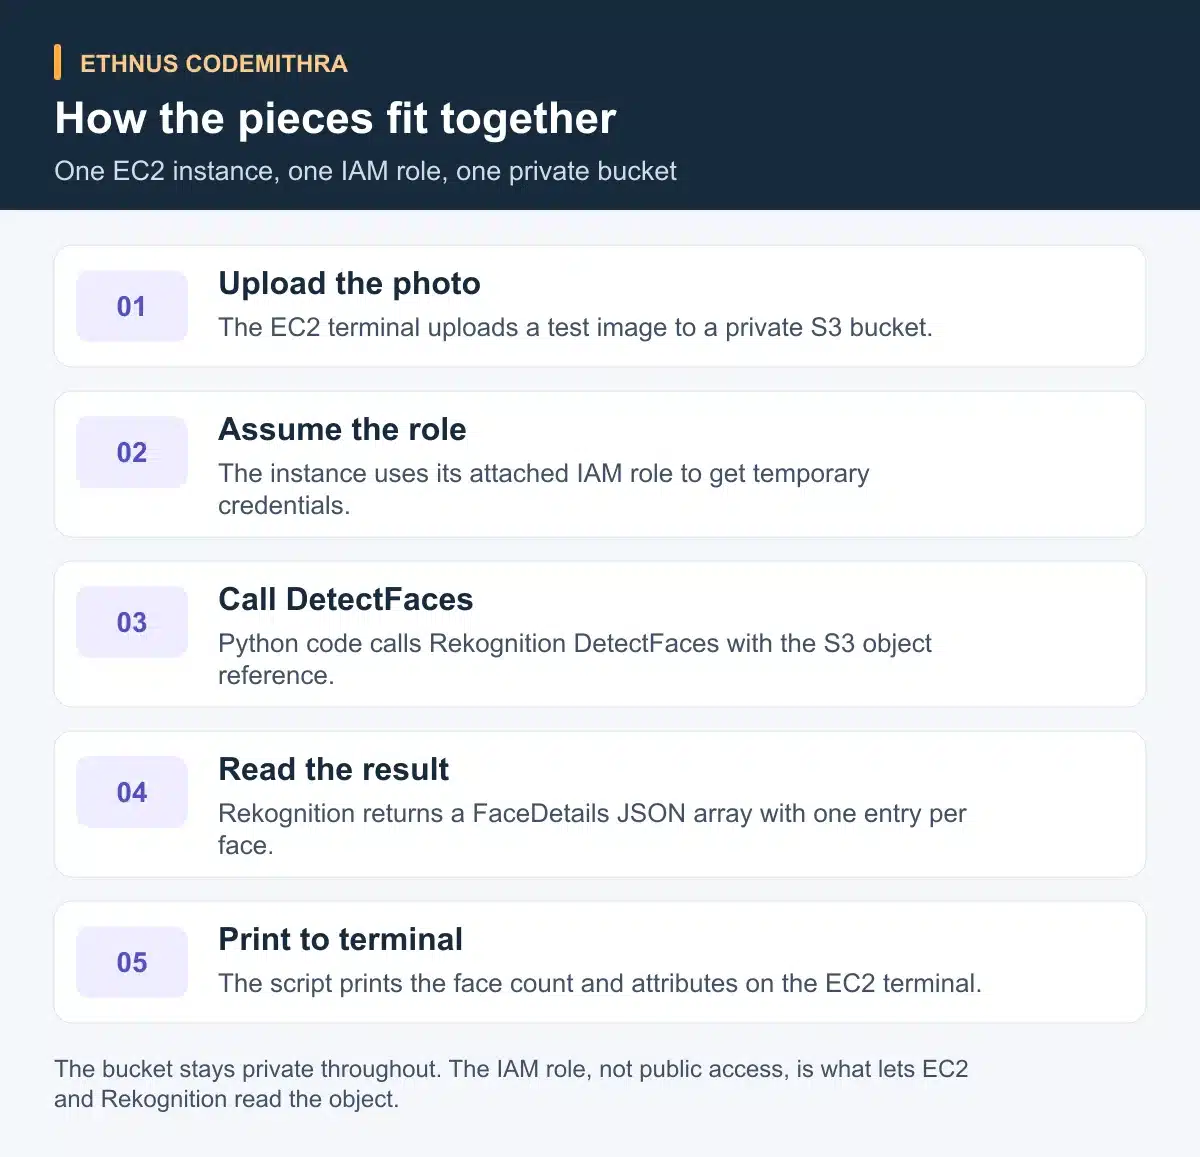
You can build a working face detection app on AWS with three services. Use an EC2 instance, a private S3 bucket and Amazon Rekognition. The instance uploads a photo to the bucket and calls Rekognition through an IAM role, not a public link. Rekognition prints its result to your terminal. What it costs depends on which AWS free plan your account is on, so read the free plan section before you start. Checked against the official AWS Free Tier and Rekognition pricing pages on 8 September 2026.
What changed since this project first went live
An earlier version of this tutorial from 2020 told readers to make their S3 bucket public. It also used the now retired t2.micro instance type. Both instructions are outdated. AWS buckets and objects block public access by default today. AWS recommends keeping all four Block Public Access settings on (AWS S3 Block Public Access documentation). This rewrite keeps the bucket private throughout and lets an IAM role do the work instead.
The other change is cost. AWS no longer gives every new account 12 months of free services. Read the next section before you create anything.
What free means on AWS today
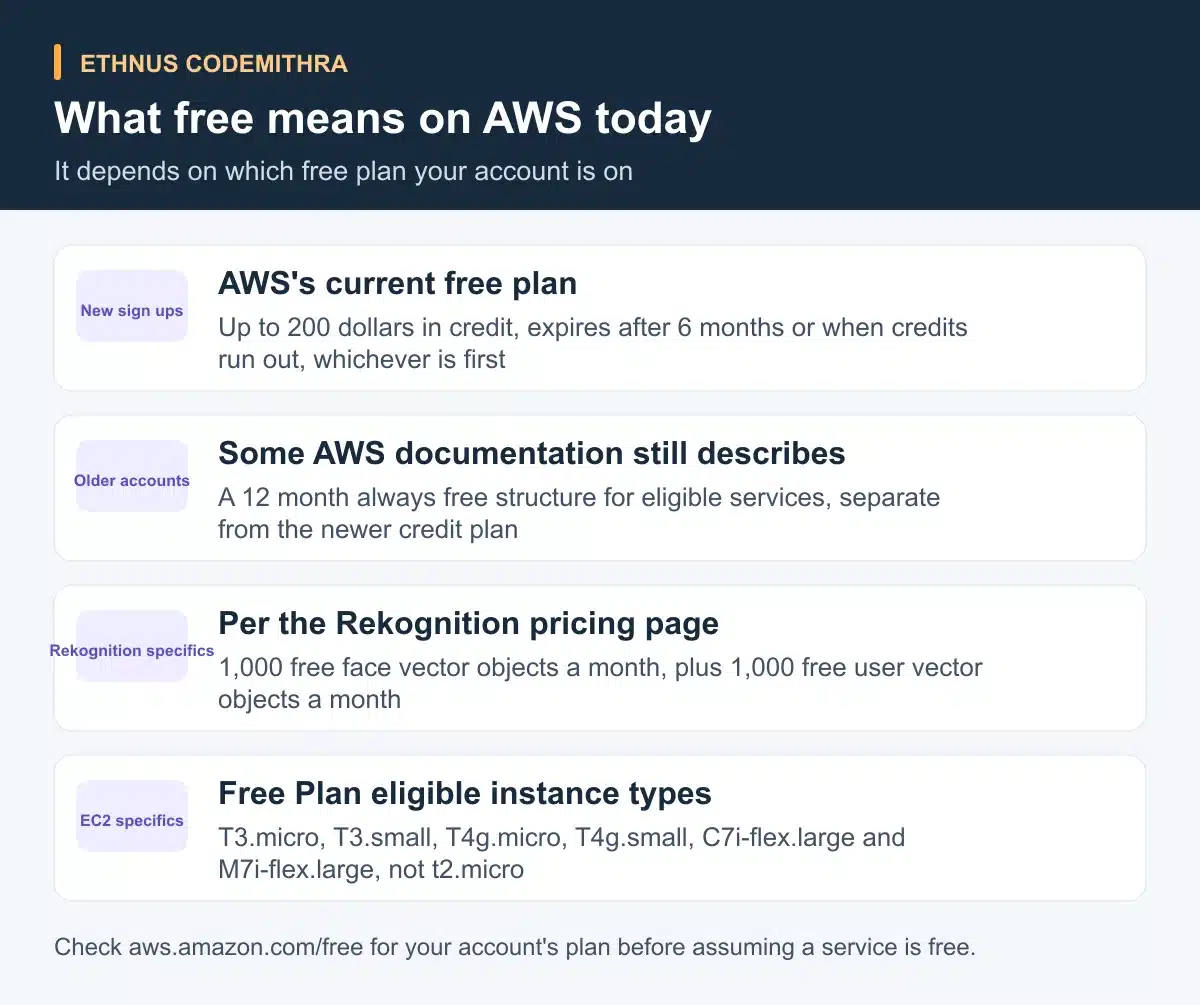
AWS's current free plan gives new sign-ups up to 200 dollars in credit over six months. New accounts get 100 dollars in credit at once, and can add up to 100 dollars more, for that 200 dollar total. The credits expire after six months, or when they run out, whichever comes first (AWS Free Tier, AWS's July 2025 announcement). Older AWS documentation separately describes an always-free 12-month structure for accounts that predate this change. Check your own account's plan at aws.amazon.com/free rather than assuming which one applies.
Rekognition's own pricing page still advertises 1,000 images a month free for 12 months from account creation. It also lists 1,000 free face vector objects a month and, separately, 1,000 free user vector objects a month (Amazon Rekognition pricing). AWS has not updated that page for the July 2025 change. Treat it as accurate only on the legacy 12-month plan. Do not assume a blanket 12 months of free Rekognition on a new signup.
Current Free Plan-eligible EC2 instance types are T3.micro, T3.small, T4g.micro, T4g.small, C7i-flex.large and M7i-flex.large. Older tutorials mention t2.micro, which is no longer on that list (AWS Free Tier compute).
Step 1: create your AWS account
Sign in or create an account at the AWS Management Console. AWS asks for a payment card during signup. The free credit and free plan limits mean this project should not draw a charge. Just follow the clean-up step at the end. Note your account's creation date, so you know which free plan row applies to you.
Step 2: pick a region and stay in it
Pick one AWS region and use it for every service in this project. US East (Ohio), region code us-east-2, has three availability zones (AWS Availability Zones documentation). Select it from the region dropdown near your account name in the console before you launch anything.
Step 3: launch a Free Plan-eligible EC2 instance
Go to EC2 in the console and launch an instance with these choices.
- Amazon Linux as the operating system image.
- An instance type from the current Free Plan list, such as T3.micro or T4g.micro. Skip t2.micro (AWS Free Tier compute).
- A new key pair, though you will use EC2 Instance Connect rather than the key file in step 5.
- A security group that allows SSH so you can fall back to a terminal client if you ever need one.
Launch the instance and wait for its status to show running before you continue.
Step 4: create a scoped IAM role and attach it
An IAM role gives your EC2 instance temporary credentials to call other AWS services. The instance does not need long-lived keys stored on the machine. AWS's current guidance favours a right-sized, least-privilege policy over broad full-access policies (AWS Identity and Access Management). Skip AmazonS3FullAccess and AmazonRekognitionFullAccess. Write a policy scoped to your one bucket and to the rekognition:DetectFaces action instead.
- In IAM, go to Roles and create a new role for the EC2 service.
- Attach a custom policy that allows
s3:GetObjectands3:PutObjecton your bucket's ARN, plusrekognition:DetectFaces. Rekognition has no resource-level permissions for that action. - Name the role and create it.
- From the EC2 console, select your instance. Choose Actions, then Security, then Modify IAM role. Attach the role you just created.
A role scoped this way still lets your code do its job. A leaked credential or a coding mistake elsewhere cannot reach other buckets or other Rekognition operations.
Step 5: connect with EC2 Instance Connect
Open a browser-based SSH session straight from the EC2 console with EC2 Instance Connect. It needs no separate SSH client, unlike the old PuTTY workflow with its key file conversion step. It costs nothing extra (AWS's EC2 Instance Connect announcement). Select your instance, choose Connect, then the EC2 Instance Connect tab, and choose Connect again. A terminal opens in your browser, already signed in as ec2-user.
Step 6: create a private S3 bucket and upload a test photo
Create an S3 bucket in the same region as your instance. Leave every Block Public Access setting on. New buckets and objects block public access by default. AWS recommends leaving that setting in place (AWS S3 Block Public Access documentation). The bucket does not need to be public. The IAM role from step 4 already grants your instance the access it needs.
On your instance terminal, install the AWS CLI and Python's boto3 library if you have not already. Then upload a test photo with a face in it.
aws s3 cp sample.jpg s3://your-bucket-name/sample.jpgUse your own bucket name here. The role from step 4 makes this command work without a public bucket or a stored access key.
Step 7: call Rekognition from Python
Amazon Rekognition's DetectFaces operation finds the 100 largest faces in an image. It reads the image straight from an S3 object reference. You never download or expose the file (AWS Rekognition DetectFaces documentation). Save the following as detect_faces.py on your instance and adjust the bucket and photo names.
import boto3

def detect_faces(bucket, photo):
    client = boto3.client('rekognition')
    response = client.detect_faces(
        Image={'S3Object': {'Bucket': bucket, 'Name': photo}},
        Attributes=['ALL']
    )
    print('Detected faces for ' + photo)
    for faceDetail in response['FaceDetails']:
        print('The detected face is between ' +
              str(faceDetail['AgeRange']['Low']) + ' and ' +
              str(faceDetail['AgeRange']['High']) + ' years old')
        print('Confidence: ' + str(faceDetail['Confidence']))
    return len(response['FaceDetails'])

def main():
    bucket = 'your-bucket-name'
    photo = 'sample.jpg'
    face_count = detect_faces(bucket, photo)
    print('Faces detected: ' + str(face_count))

if __name__ == '__main__':
    main()
Run it with python3 detect_faces.py. The response holds a FaceDetails list, one entry per detected face. Each entry carries attributes such as age range and confidence, since the code requests Attributes=['ALL']. Your terminal prints the face count and the attributes for each face found.
Step 8: clean up before you close the terminal
Before you move on, remove everything you created so nothing draws down your credit balance later.
- Terminate the EC2 instance from Actions, then Instance State, then Terminate.
- Delete the IAM role you created in step 4.
- Empty the S3 bucket, then delete the bucket itself.
Do this in the same session, while the steps are fresh, rather than leaving the instance running for later.
Try it yourself: swap the operation
Once DetectFaces works, change one line in the script to call compare_faces or detect_labels instead. Keep the same S3 object and the same IAM role. Compare what each response structure returns before you decide which operation solves your use case. This shows how much of the code above is really about Rekognition's API shape, rather than about faces specifically.
How this fits with Ethnus training
Ethnus and Codemithra run this same project live inside the AWS Cloud Masterclass, a three-hour class. Its named hands-on project builds a facial recognition app. It awards a certificate and badge from Ethnus and NASSCOM FutureSkills after a post-class assessment. The AWS Solutions Architect Associate course teaches the same EC2, S3 and IAM concepts in more depth, plus DynamoDB and CloudWatch. It includes lab access and trainer support. Ethnus reached the milestone of training over 5 lakh students across all its programs (About Ethnus).
Frequently asked questions
Do I need to make my S3 bucket public for Rekognition to read it?
No. Keep Block Public Access on. The IAM role attached to your EC2 instance grants access instead. Rekognition and your code read the object through that role, not through a public bucket policy.
Will this project cost me anything?
It should not, if you stay within your account's free plan and delete the instance, role and bucket straight after. Check whether your account uses the newer credit-based plan or the older 12-month plan before you start.
Why not use t2.micro like older tutorials show?
t2.micro is no longer on the current Free Plan instance list. Use T3.micro, T4g.micro or another instance type from the current list instead.
Do I need PuTTY to connect to the instance?
No. EC2 Instance Connect gives you a browser-based terminal from the console with no separate client, unlike the old PuTTY workflow.
What does DetectFaces actually return?
A FaceDetails list, one entry per face found, up to the 100 largest faces in the image. Each entry can carry attributes such as age range and confidence.
Try this project, then go further with Ethnus Codemithra's AWS Solutions Architect Associate course. If you are new to AWS, start instead with AWS Cloud Practitioner Essentials.